
How To Redirect .pages.dev to Your Domain
Learn how to redirect .pages.dev to your domain with this step-by-step guide
Published on:Why Redirect Your .pages.dev Domain
When you deploy a site with Cloudflare Pages, it automatically creates a subdomain on pages.dev (like yourdomain.pages.dev). While this is convenient for testing, you’ll typically want visitors to only access your site through your custom domain. Redirecting your .pages.dev domain to your custom domain offers several benefits:
-
Prevents duplicate content issues that can harm SEO
-
Ensures consistent analytics tracking under a single domain
-
Maintains brand consistency by using only your official domain
-
Simplifies URL management and sharing
Quick Note: Staging server redirects
If you’re interested in creating a staging environment for your site, the steps in this guide will be unnecessary. You can follow our guide below that also covers .pages.dev redirects including a staging environment.

Create A Staging Environment For Cloudflare Pages
Set up a secure, password-protected staging environment for your Cloudflare Pages site with this step-by-step guide
Setting Up the Redirect in Cloudflare
Follow these steps to redirect your .pages.dev domain to your custom domain:
- Log in to your Cloudflare dashboard
- Click on “Bulk Redirects” at the bottom of the left sidebar
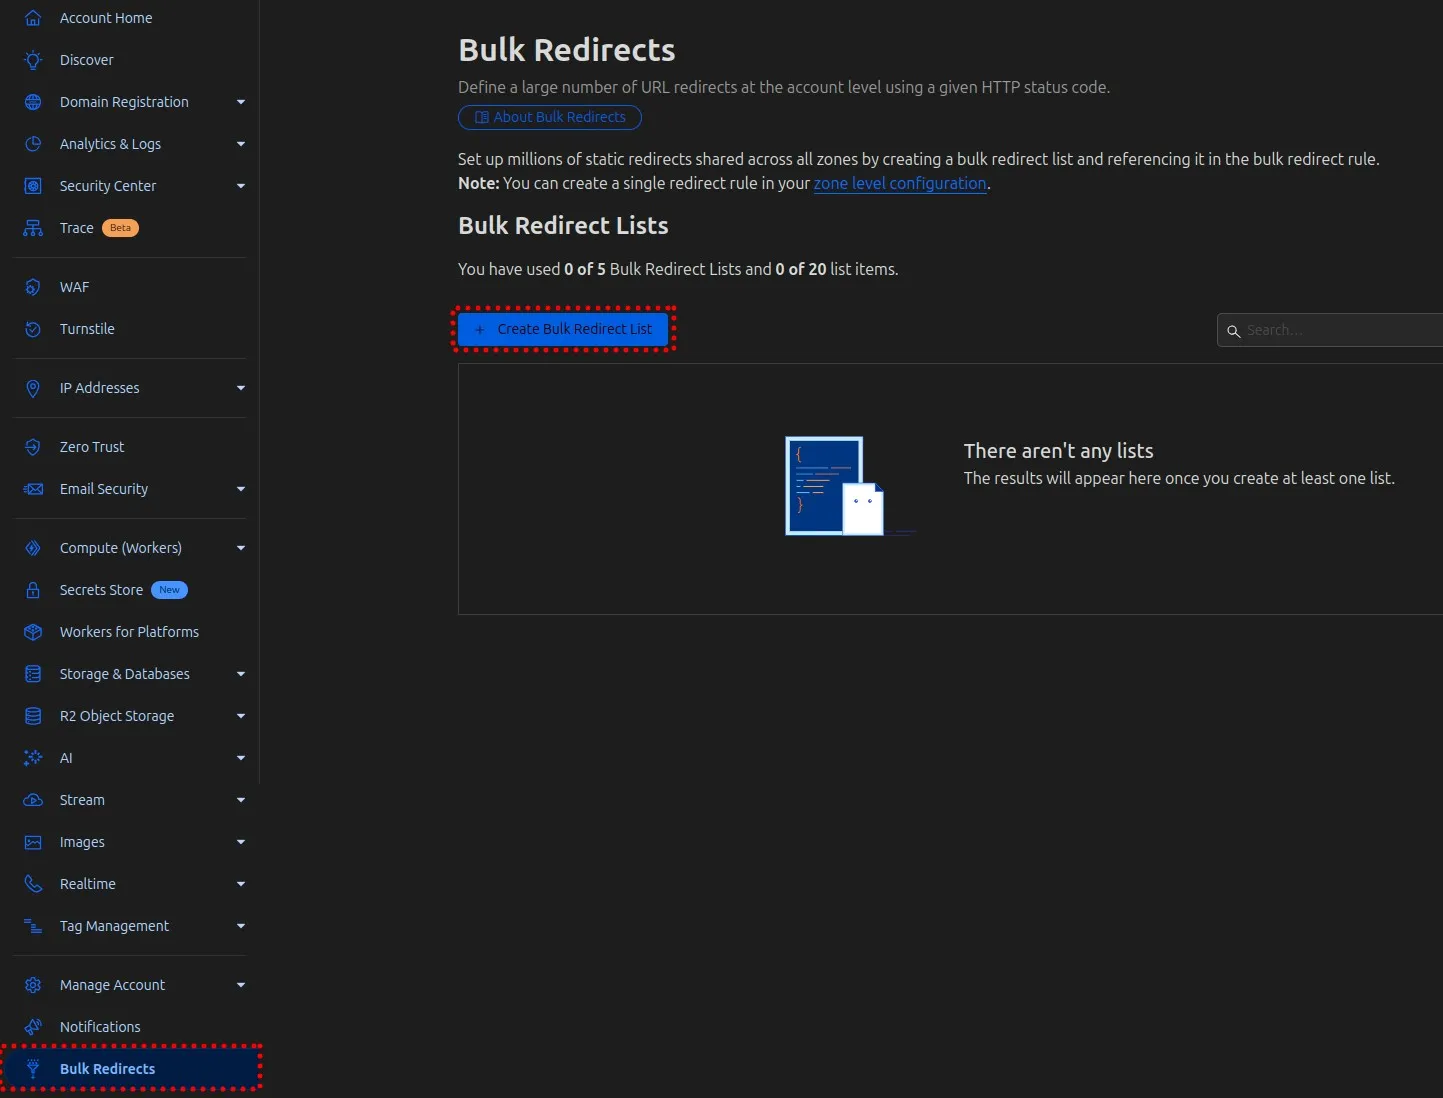
Creating a New Redirect Rule
If you don’t already have a redirect list:
- Click “Create bulk redirect list”
- Give your list a descriptive name (e.g., “pages_dev_redirects”)
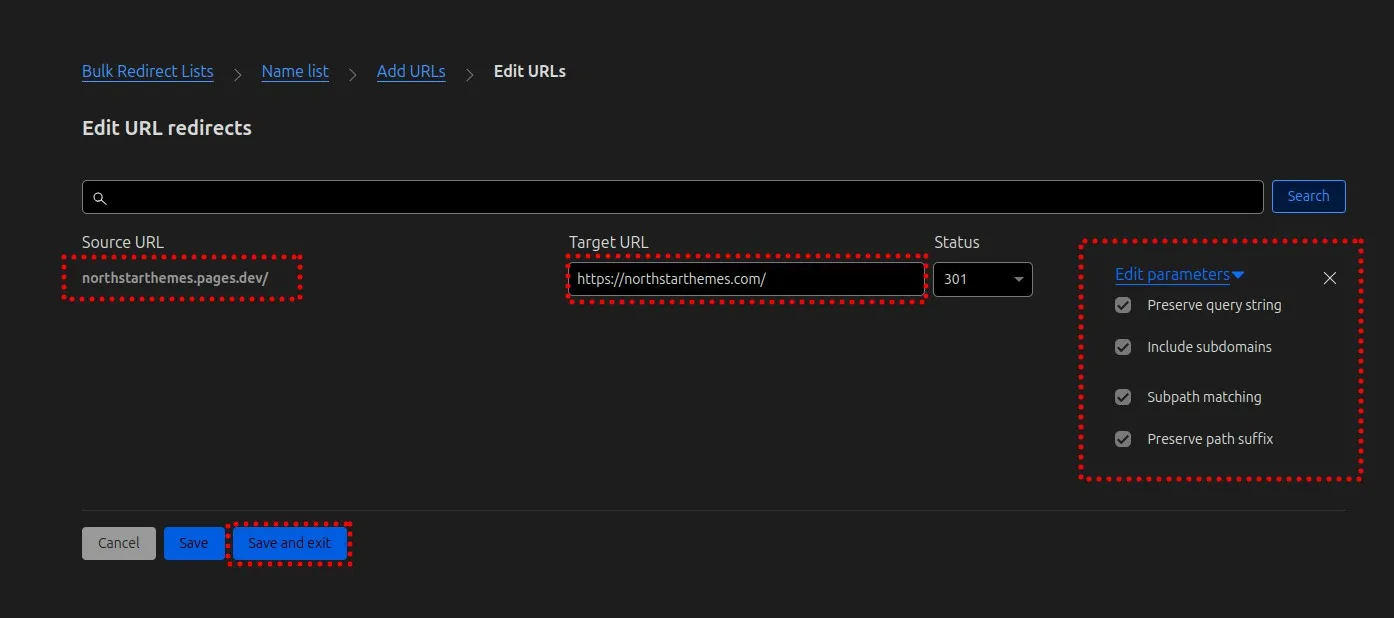
- Under the “Add URLs” section, click “Manually add URL redirects”
- Enter the following details (replacing
yourdomainwith your actual domain):- Source URL:
yourdomain.pages.dev/ - Target URL:
https://yourdomain.com/ - Status code: 301 (Permanent Redirect)
- Source URL:
- Check all parameter options under “edit parameters”
- Click “Save and continue”
- On the next screen, click “Continue to redirect rules”
- Give your rule a name (e.g., “pages_redirects”)
- Click “Save and deploy”
Limited Time Launch Sale
Our AstroJS starter template saves you time and ensures proper SEO practices from day one.
GET 60% OFF!Testing Your Redirect
- Open an incognito browser window (to avoid cached results)
- Visit your pages.dev URL (e.g., yourdomain.pages.dev)
- You should be automatically redirected to your custom domain
- Try visiting a specific page on your pages.dev domain to ensure path preservation works
Common Issues and Troubleshooting
- Redirect not active: Redirects can take a few minutes to propagate. Wait 5-10 minutes and try again.
- Caching issues: Your browser might be caching the old response. Try in an incognito window or clear your browser cache.
- Parameter settings: Ensure you’ve checked the appropriate parameter settings to preserve paths and query strings.
SEO Considerations
This redirect approach uses a 301 (permanent) redirect, which is the best option for SEO. This tells search engines that your content has permanently moved to the new location, and they should transfer any ranking signals to your custom domain.
After implementing the redirect, you may want to:
- Update your Google Search Console to include your custom domain as the primary property
- Submit your sitemap through your custom domain
- Monitor for any crawl errors related to the redirect
Your Cloudflare Pages Site Redirect Is Complete
By redirecting your .pages.dev domain to your custom domain, you’ve taken an important step in maintaining a consistent online presence and optimizing your site for search engines. This simple configuration ensures that all visitors arrive at your branded domain, regardless of which URL they initially access.
For more details you can check out the Cloudflare Pages documentation.
Related Articles

How To Create A Secure Staging Environment For Cloudflare Pages
Testing website changes before they go live is essential for maintaining a professional online presence. Learn how to create a secure, password-protected staging environment for your Cloudflare Pages site.

Schedule Cloudflare Pages Builds
Schedule your Cloudflare Pages builds to run at specific times. No external services needed.

Fix Bad Indentation Of A Mapping Entry Error In Astro
Troubleshoot and resolve the common "bad indentation of a mapping entry" error in AstroJS with this practical guide.

Submit Your AstroJS Sitemap to Google Search Console
Submitting your AstroJS sitemap to Google Search Console is essential for ensuring your website gets properly indexed and ranks well in search results.